![What is Docker and what is Docker used for? [2018 tutorial]](https://takacsmark.com/assets/images/post-thumbs/what-is-docker.png)

- What is Docker
- Let’s see an example
- The build, ship, and run cycle
- What problem does Docker solve
- The website example with Docker
- What are the benefits of Docker
- Next steps
I wrote the original Getting started with Docker in your projects step by step tutorial almost two years ago, and I think it’s time for an improved version. I’m starting a new tutorial series with this post and I think a fresh tutorial needs a fresh intro.
I wrote the initial article jumping into technical details immediately, because my main focus was to explain how you can get started with containers in your project work.
This time I’ll take a different approach. Docker went through massive evolution, I used Docker in many new ways and I wrote a comprehensive book about the topic, so I think I have also become wiser.
I’m starting this new tutorial series with an overview of the Docker ecosystem, explaining what Docker can offer to your projects in the build, ship and run activities of software delivery.
This article features working examples, just like any other tutorial that I write. I explain Docker concepts using everyday words, without mysterious jargon.
This article is designed to be a functional introduction of Docker concepts with not too deep technical details. Don’t worry, though, more details will come in the next articles and we’ll definitely come to hard core hacking pretty soon.
This post is intended for developers, operations people, managers, students and professionals alike who have working knowledge of building and delivering software and want to get started with Docker.
What is Docker
Let’s start with a video!
You can download the presentation using the button below. Download Presentation
Docker is a tool for companies/teams/individuals who develop, deploy and run software on a regular basis.
The core idea of Docker is that you can use Docker to encapsulate your application’s source code, your application’s configuration files and server runtime into a single entity, called the container.
You can think of a Docker container as your application process running in an isolated box that contains your application plus all of its dependencies, including server programs, configuration files, libraries, etc.
Let’s see how this works!
Docker containers are defined in the form of Docker images.
The main source of Docker images is the Docker Hub, where you’ll find about 1,5 million different images available for free. The screenshot shows the first few items on the list on the Docker Hub.
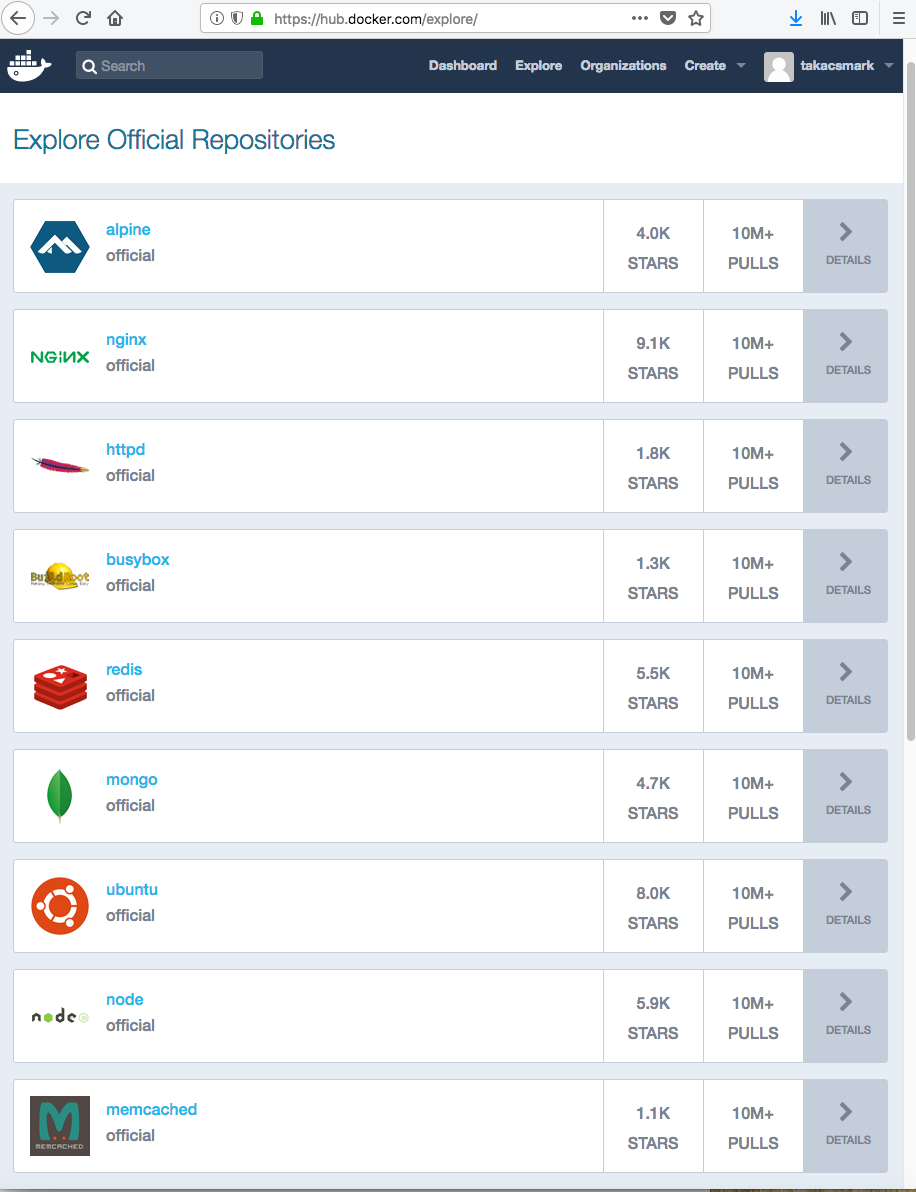
You’ll find images for almost any technology you’d probably want to use in your projects. A few examples would be Nginx, Redis, Node, Memcached, Mongo, as you can see on the screenshot.
The Nginx image has Nginx pre-installed, the Redis image has Redis, Node has Node.js pre-installed, and so on.
I’m sure you’ll get the idea if I show what’s inside an image.
These images are technically file system snapshots, in the form of a Linux file system. The Nginx image, for example, contains the below Linux file system directories:
/ # ls
bin    dev    etc    home   lib    media  mnt    proc   root   run    sbin   srv    sys    tmp    usr    var
The standard directories contain a set of Linux files, that the creator of the image has included. You’ll find, for example, some standard system programs in the Nginx image under /bin, like grep, gzip, mv,ps and such.
The Nginx image also contains an Nginx installation. The Nginx binary is located under /usr/sbin/nginx:
/ # ls /usr/sbin
add-shell     brctl         delgroup      fdformat      nanddump      nginx-debug   rdate         remove-shell  setlogcons
addgroup      chpasswd      deluser       killall5      nandwrite     ntpd          rdev          rfkill        zdump
adduser       chroot        ether-wake    loadfont      nbd-client    partprobe     readahead     sendmail      zic
arping        crond         fbset         lspci         nginx         powertop      readprofile   setfont
The location of the Nginx config files in the Nginx image is /etc/nginx:
/ # ls /etc/nginx/
conf.d                  fastcgi_params.default  mime.types.default      scgi_params             win-utf
fastcgi.conf            koi-utf                 modules                 scgi_params.default
fastcgi.conf.default    koi-win                 nginx.conf              uwsgi_params
fastcgi_params          mime.types              nginx.conf.default      uwsgi_params.default
So, a Docker image contains all the files that are needed to run a certain technical component. In case of the Nginx image, you find the Nginx executable binary and the config files and a standard location where you should put your website source code. You also find systems tools in the Docker images (like gzip and mv) that you may need.
You can download a Docker image from the Docker Hub with the docker pull command. This will copy the image to your machine.
Now you can use the docker run command to start up as many containers as you wish from the image you pulled.
A Docker container is a running instance of a Docker image.
To be able to pull images and run containers, you need to install Docker on the machine where you want to use it. The installed component that let’s you run and manage containers is called the Docker Engine.
So if you want to start up an Nginx web server on your machine, you don’t need to install and configure Nginx. You just pull the Nginx image from the Docker Hub and start up a container and you’ll have a working Nginx web server right away.
This is possible, because the Nginx Docker image already contains the Nginx web server and the Docker Engine will start up the Nginx process in the container.
If you want to add your own code and configuration to a Docker image, like Nginx, all you need to do is to extend the official Nginx image and copy your configuration files and code files into the image’s file system.
Let’s see an example
Let’s have a closer look, I created a one-pager website demo that looks like this:

Full source code is available on GitHub: https://github.com/takacsmark/onepagewebsite-nginx-bootstrap-webpack-dockerized.
Let’s say your team is developing the above website. Your developers create and unit test the source code of your application. Once the unit tests are complete they have a structure similar to the below in their project:
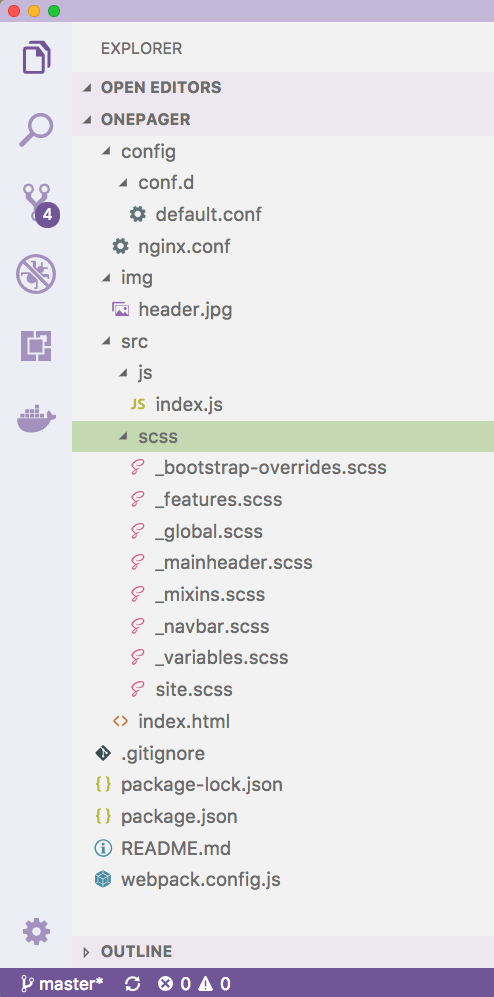
The project contains source files for various purposes like HTML files, SCSS style sheets, and Javascript; plus the project contains the configuration files that are needed to serve this website with an Nginx web server.
If you are not using Docker and you want to start this website on a cloud server, you need to complete the following steps:
- install Node.js on the development machine
- use Node.js to generate the distribution code with Webpack
- start up a server machine in the cloud (with AWS, Azure, Google or another cloud provider or your private cloud)
- install Nginx on your cloud server
- copy the Nginx configuration to the server
- copy the default configuration to the server
- copy your site’s distribution code to the server
- start up Nginx on the server
If you are using Docker, however, you can accomplish the same with the following steps:
- create a custom Docker image that
- builds your distribution code with the official Node.js image automatically
- contains your distribution code
- contains your Nginx configuration and default site configuration
- contains the Nginx web server pre-installed based on the official Nginx image
- push your custom Docker image to the Docker Hub
- start up a server machine with Docker installed in the cloud (with AWS, Azure, Google or another cloud provider or your private cloud)
- pull your image from the Docker Hub and start a container running your website with a single command
If you are using Docker, you can define all the build steps and runtime characteristics of your application during build time declaratively in standard file formats provided by Docker.
Once you declared the build steps and runtime behavior, you can start up the same application the same way on any machine that has Docker installed.
With Docker, your application is bundled with its environment. You don’t need to install any of the components on the target system, you just work with Docker images and run containers.
Docker makes your applications highly portable and reduces quality risks due to its high level of standardization.
The build, ship, and run cycle
Docker is used all along the development lifecycle. You can use its tools to support your workflow during building, shipping and running your applications. Build, ship and run is actually Docker’s main slogan.
Build
To build the one-pager website example, you’d need to conduct the following steps during build:
-
You create a simple text file, called the Dockerfile. The Dockerfile defines the build steps of your project’s custom Docker image. Add the steps to the Dockerfile to generate your website’s distribution code starting from the official Node.js image.
Add the steps to the Dockerfile to copy the website distribution code and the Nginx configuration files next to the Nginx server into the official Nginx image.
Now you have your server environment defined as code in the Dockerfile that you can re-create anytime the same way with a single command on any machine.
- You use the
docker buildcommand to build your project’s Docker image from the Dockerfile, the resulting image will contain the Nginx server with your custom configuration files and your website’s code. - You can start your website with the
docker runcommand now. This command will start a Docker container based on your project’s Docker image. The container’s main process will be the Nginx web server that serves your site.

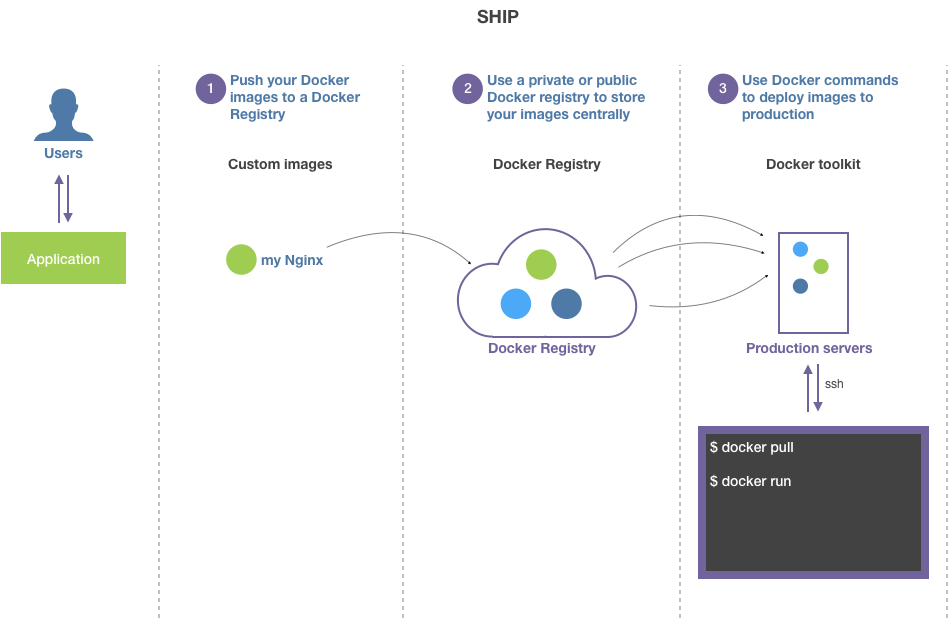
Ship
You can ship your application with the following steps:
- You can start up a Docker container from your project’s Docker image on any computer with the
docker runcommand, all you need to do is ship your image to the other computer. - You can achieve this by pushing your project’s custom Docker image to the Docker Hub with the
docker pushcommand. (Or you can create a private registry similar to the Docker Hub, we’ll talk about this later.) - Now you can use the
docker pullcommand for your project’s custom image on another computer to pull your image from the Docker Hub and start up a container. You need to make sure that the other computer has Docker installed.
As you can see, you don’t need to install and configure the Nginx server and deploy your code on the other computer. You can grab everything bundled in your Docker image.
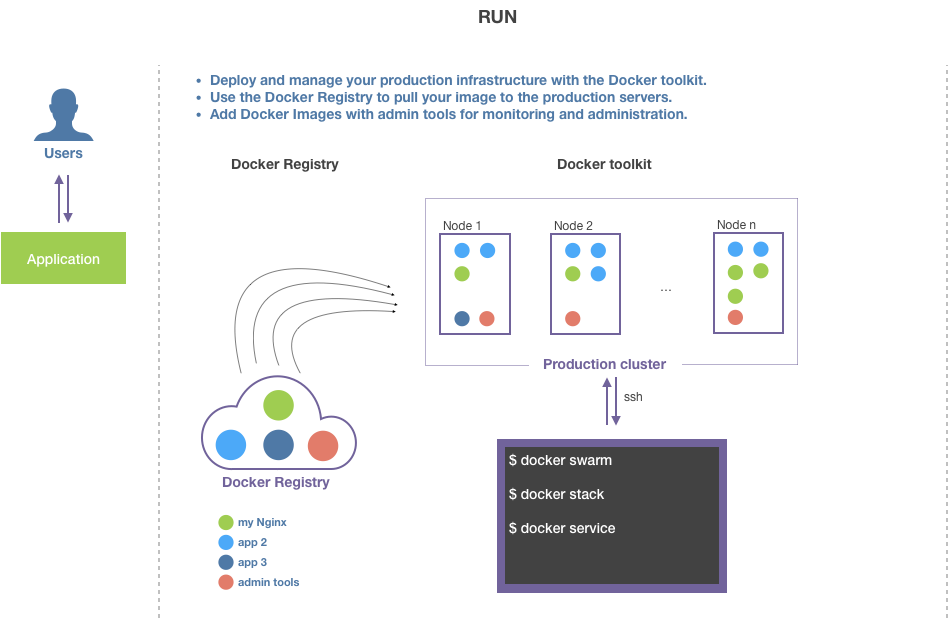
Run
There are sophisticated and mature solutions to run your dockerized applications in production:
- You can run your Docker-based applications with Docker’s standard tools. Docker has an orchestrator built-in, called Swarm, that you can use to manage high-availability, scaled applications on computer clusters.
- Google’s container orchestrator - Kubernetes - is the market leading solution to orchestrate Docker-based applications, that’s why you’ll see more and more out-of-the-box Kubernetes support in Docker.
Working with Docker, you’ll create your infrastructure as code during the build phase and you use standard Docker commands to ship and run your application anytime and anywhere.
What problem does Docker solve
Now that you have seen the basics, let’s se what is the problem Docker was designed to solve.
Docker solves the problem of having identical environments for your applications across various stages of development. These environments (i.e. Docker containers) share as many resources as possible while keeping the environments isolated and highly portable. Docker provides light-weight, portable, isolated, fully customizable application environments in the form of containers.
Now that you know that Docker provides portable, isolated runtime environments for your applications, you may be thinking that virtual machines provide similar benefits. Your are right, Docker containers are a form virtualization. Docker containers are often compared to virtual machines and we’ll deep dive into the details and differences in my next article.
We saw above that you build Docker images for your applications. These images contain server programs, configuration and source code. Images contain your application and all of its dependencies.
This means that you only need Docker installed on any machine to start up your application with the exact same dependencies. This means that you ship your application’s environment along with your application in the Docker image and you do not need to install and configure other components to run your application.
This makes your applications super portable.
Docker is declarative; you define your Docker images in one or more Dockerfiles. The Dockerfile has a well defined format that you can find here: https://docs.docker.com/engine/reference/builder/.
You should add your Dockerfile(s) to source control, so that you can build the same Docker image(s) on any machine.
If you are thinking now that complex applications need more Docker images and you need some way to define how these images work together, you are right.
Docker provides the Docker Compose tool to work with multi-container applications (we’ll see this later), where you can define multiple application services declaratively in the Compose file, also called docker-compose.yml, which is the file’s default name.
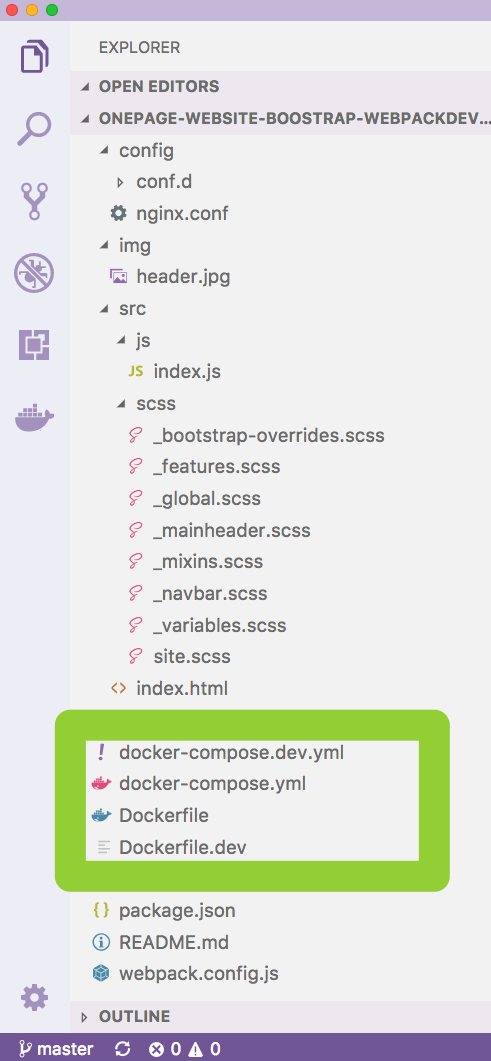
The website example with Docker
Let’s see how I implemented what I explained so far to build and run the onepager website example. I added two files to Define the build environment and behavior:
- Dockerfile.dev
- docker-compose.dev.yml
I also added two files for production:
- Dockerfile
- docker-compose.yml
Let’s check out how the development setup works! This is an introductory post, so I’ll not explain every step in detail, we’ll do that later, I just want you to get the big picture.
Dockerfile.dev defines the development image of the project:
FROM node:9.11.2-alpine

WORKDIR /usr/src/app

COPY package.json package-lock.json webpack.config.js ./
RUN npm install

EXPOSE 8080

CMD npm run dev
The development Dockerfile will start from the official node:9.11.2-alpine Docker image, that has Node.js pre-installed and is available on the Docker Hub{target=”_blank”}.
In Dockerfile.dev we define the working directory to be /usr/src/app, we copy our Node.js package.json files and Webpack config file into the image. We then install the npm packages with npm install, and define npm run dev to be the main command of the container, which will start the Webpack dev server as the main process.
We expose port 8080, which indicates that our Webpack dev server will run on port 8080. Now that we have our image defined, we can build the image with the docker build command:
$ docker build --tag takacsmark/web-intro.exmple:dev-1.0 --file Dockerfile.dev .

Now I have a new Docker image on my computer that I can list with the docker image ls command:
$ docker image ls
REPOSITORY                      TAG                 IMAGE ID            CREATED             SIZE
takacsmark/web-intro.exmple     dev-1.0             1facbf4ac56b        17 minutes ago      164MB
node                            9.11.2-alpine       a56170f59699        2 weeks ago         68.5MB
You can see that I have the node:9.11.2-alpine image also on the list that I used as parent image to build my project’s custom image.
Now I can use a single Docker command to start up a container for development from this image like this:
docker run --rm -p 8080:8080 -v $(pwd)/src:/usr/src/app/src -v $(pwd)/img:/usr/src/app/img takacsmark/web-intro-exmpl:dev-1.0
Let’s not worry about the details too much now, this is to give you the high level idea.
The Webpack dev server is up and running. I did not need to install Node.js or any of the node modules on my machine to make this work, everything is encapsulated into a Docker container.
I have automated the build and run steps in a Compose file that I named docker-compose.development.yml.
Now I don’t need to type in the long build and run commands we just used, because we have specified the build and run options in the Compose file and we can use a single command to build and run our application.
The Compose file defines the build and runtime behavior of my project. It looks like this:
version: "3"

services:
  webpack:
    build:
      context: .
      dockerfile: Dockerfile.dev
    image: takacsmark/web-intro-exmpl:dev-1.0
    ports:
      - 8080:8080
    volumes:
      - ./src:/usr/src/app/src
      - ./img:/usr/src/app/img
Note how the options match the command line parameters of the docker build and docker run commands that I used above.
I defined one service with the name webpack and specified how to build my custom image under the build section. I also specified the runtime parameters that you have already seen in my docker run command above. Users can start up my project the same way with a standard command called docker-compose up based on the Compose file:
docker-compose --file docker-compose.dev.yml up
This command will build and run my project’s development configuration as defined in docker-compose.development.yml.
What are the benefits of Docker
Companies enjoy different benefits of Docker based on their use cases and application areas.
Infrastructure cost savings
One of the most discussed benefits of Docker is that you can use Docker to replace virtual machines. When your strategy is to use virtual machines to run your applications in isolation, you have to set up a full blown virtual machine for every component you wish to run in an isolated environment.
If you use Docker containers to isolate your application components instead of virtual machines, you’ll get a much leaner infrastructure, because containers are much lighter than virtual machines. You can read more about this in my next article.
Docker containers provide a high level of isolation to your applications that run in the containers, while containers are designed to share a lot of resources. This makes them more resource effective than isolating your applications using dedicated virtual machines. This may result in higher workload density, thus reduced server costs depending on your architecture.
While this is a commonly discussed benefit, my experience is that many companies start Docker adoption in other domains, especially if they apply Docker to existing systems.
Standardized development
A met several companies that started their Docker journey in the development space.
Developers often use different machines to write code. Some of them use a Windows laptop, others use Macs and a good number of developers use a Linux operating system for work.
Setting up the same development environment on all these different platforms is challenging with regular tools.
If you consider that your test, staging and production servers run on yet another platform, the picture gets even more complex.
This will result in the frequent “it worked on my machine” syndrome, when differences in your environments give you bugs that are hard to reproduce, debug and fix.
With the use of Docker you can build and run the same environment on all the platforms that I mentioned, plus your development environment is the same environment that you’ll use in production, too.
There is only a subtle difference between Docker on various platforms under the hood, which means that only edge cases will give you environmental errors. (e.g. if your application uses a custom version of the Linux kernel to implement some feature.)
Many companies use Docker to provide a standard development environment for developers.
Rapid prototyping
Another great use case for Docker is experimentation with new technologies.
As we’ve seen in the article, you can start up a working environment with popular cloud technologies in the matter of seconds. No installation and configuration is required, you can focus on your requirements immediately.
Docker makes it very easy and fast to set up a new environment for rapid prototyping. This scenario is beneficial for companies developing software products and it’s very relevant for R&D institutions, academic domains and students.
Improve the CI pipeline
I know teams that have replaced their application runtimes with Docker containers, while keeping the rest of the infrastructure untouched. This scenario is especially relevant in enterprises working with monolithic legacy applications.
In this scenario, you pack your application and dependencies into Docker images and you keep your existing solutions for load balancers, monitoring, failover and such in their original set-up (updated to work with the containers, of course).
In this scenario you’re not leveraging a container orchestrator like Swarm or Kubernetes, and your stack is not entirely containerized.
You still enjoy the benefits, because your deployment entity is a Docker image that improves your CI flow.
Just think of the quality improvement packing your legacy Java application into a Docker image and push that image through your CI pipeline. All the Java versioning and configuration issues live in your Docker image now and you can push through the same image for testing and production.
Infrastructure as code
In a full blown containerization scenario you plan your entire application to be built, shipped and run with Docker. This is particularly suited for cloud native applications and new product development both in large enterprises, small business, and startups.
You’ll enjoy all the benefits that I listed so far, plus you’ll gain significant quality boost, because your entire stack is defined declaratively in standard files.
This makes your applications highly portable, it gives you the flexibility to compose the best services and offerings of various cloud service providers and manage your entire stack as one across multiple cloud platforms.
Next steps
I’m sure you have a lot of open questions right now. If you feel like starting a code-along tutorial, check out my book, Get started with Docker in your projects through examples, or the free learning content on the blog and my youtube channel.
You can find the source code for the one page website on Github: https://github.com/takacsmark/onepagewebsite-nginx-bootstrap-webpack-dockerized.
In the next post we’ll touch the following main topics:
- Why is Docker compared to virtual machines? What is the difference?
- How are container resources isolated?
- Linux based containers and Windows based containers