![Dockerfile tutorial by example - basics and best practices [2018]](https://takacsmark.com/assets/images/post-thumbs/dockerfile-tutorial-by-example-post.png)

- Overview
- What is a Dockerfile and why you’d want to use one?
- Dockerfile basics
- Dockerfile best practices
- Dockerfile key instructions best practices
- My Dockerfile building workflow
- Wrap up
Overview
This article will help you understand the concept behind creating a Dockerfile. Moreover I’ll explain why and in which situations you’ll want to use a Dockerfile in the first place.
We’ll go through a few examples of my workflow for creating my Dockerfiles and I’ll share my experience and best practices regarding working with Dockerfiles.
This article is the writeup of 2 Dockerfile video tutorials on my Youtube channel, meaning I created the videos first and I’m adding the details in written form now. You’ll find the videos included in this article as you read and progress through the content.
This is a pretty lengthy article (over 5500 words), you can think of it as a chapter of a Docker book. Please be patient, every part of it contains practical information, I hope you’ll find it useful.
Enjoy!
Let’s start the first video.
What is a Dockerfile and why you’d want to use one?
A Dockerfile is a text file that defines a Docker image. You’ll use a Dockerfile to create your own custom Docker image, in other words to define your custom environment to be used in a Docker container.
Since this tutorial is for beginners let’s go slow and go deeper into the above definition.
Recap of Docker base terms
Let me repeat a few basic concepts to better explain. If you are absolutely new to docker, please start with the Getting started with Docker - step by step tutorial - article on the blog. It got 1,500 likes on Youtube from 120,000 views, so it’s not only me who says you’ll get this, so don’t worry. :)
Docker’s main purpose is to give us run-time environments that we can re-create/reproduce on any machine (that runs Docker). The main advantage is to avoid the situations when we say “it worked on my machine”, because Docker containers will give us the same environment on all machines.
In order to follow this article you need to understand the following 2 basic concepts of Docker:
-
Docker containers: containers are runtime environments. You usually run one main process in one Docker container. You can think of this like one Docker container provides one service in your project.
For example you can start one container to be your MySQL database and start another container to be your Wordpress server and connect these containers together to get a Wordpress project setup.
You can start containers to run all the tech you can think of, you can run databases, web servers, web frameworks, test servers, execute big data scripts, work on shell scripts, etc.
-
Docker containers are started by running a Docker image. A Docker image is a pre-built environment for a certain technology or service. A Docker image is not a runtime, it’s rather a collection of files, libraries and configuration files that build up an environment.
The main source of Docker images online is the Docker store. You just need to search for your preferred tech component, pull the image from the store with the docker pull command and you are ready to start up containers.
Containers are started from images with the docker run command. An image, as you’ll see in the videos, is a layered representation of your environment. These layers contain the files and configuration needed by your environment.
As you start up a container with docker run, Docker will add another layer on top of your image. While your image layers are read-only, the additional layer added by the container is read-write.
Why and when you’d want to use a Dockerfile?
So let’s go back to the definition: A Dockerfile is a text file that defines a Docker image. You’ll use a Dockerfile to create your own custom Docker image, in other words to define your custom environment to be used in a Docker container.
You’ll want to create your own Dockerfile when existing images don’t satisfy your project needs. This will actually happen most of the time, which means that learning about the Dockerfile is a pretty essential part of working with Docker.
You’ll see in the tutorial that a Dockerfile is a step by step definition of building up a Docker image. The Dockerfile contains a list of instructions that Docker will execute when you issue the docker build command. Your workflow is like this:
- you create the Dockerfile and define the steps that build up your images
- you issue the
docker buildcommand which will build a Docker image from your Dockerfile - now you can use this image to start containers with the
docker runcommand
You’ll usually start searching for available Docker images on the Docker store, you’ll also find images on github included with a good number of repos (in the form of a Dockerfile), or you can share Docker images within your team or company by creating your own Docker Registry (I’ll write about this in an advanced tutorial).
The definition also implies that the images that you’ll find on the Docker store are defined in Dockerfiles. We’ll review some Dockerfiles in the first video. A Docker image is created by building a Dockerfile with the docker build command. We’ll see examples later.
This means that technology vendors and developers usually provide one or more Dockerfile(s) with their specific technologies. They define the steps of building the image in the Dockerfile and they use docker build to create the Docker image.
What happens if you can’t find the exact Docker image that you need for your project? Most images are generic and won’t cover your exact case. This is the point when you’ll create your own Docker images.
All you need to do is to create a text file named Dockerfile (with no extension) and define your image. You’ll see that you’ll create your own images with almost every project you start, I usually create my own images for sandboxes and playgrounds, too.
This tutorial will teach you how to define, build and run your own images.
Dockerfile basics
In the first video you’ll find the key concepts, Dockerfile examples, I teach you how to manage your Docker images locally and we’ll create a custom image and understand the concept of layering.
Dockerfile example
Let’s start with an example and see what’s in a Dockerfile. I attached the below Dockerfile from GitHub, this file is part of the official PHP image distribution on the Docker store.
You can access the file directly via this url: https://github.com/docker-library/php/blob/f4baf0edbc4e05e241938c68bcc7c9635707583d/7.2/stretch/apache/Dockerfile.
Please browse through the file, it’s enough for now if you note the key structural elements, skim trough the comments and see how the file is built up on a high level.
<script src="https://gist-it.appspot.com/https://github.com/docker-library/php/blob/f4baf0edbc4e05e241938c68bcc7c9635707583d/7.2/stretch/apache/Dockerfile"></script>
At this point I would like you to understand the following key points based on the example file:
- The Dockerfile is a text file that (mostly) contains the instructions that you would execute on the command line to create an image.
- A Dockerfile is a step by step set of instructions.
- Docker provides a set of standard instructions to be used in the Dockerfile, like
FROM,COPY,RUN,ENV,EXPOSE,CMDjust to name a few basic ones. - Docker will build a Docker image automatically by reading these instructions from the Dockerfile.
So from a developer, or tech user perspective you’ll be basically describing the build steps of your environment in the Dockerfile. Then you’ll build your image from the Dockerfile and start up your containers.
This also implies that understanding Dockerfile instructions is not enough to create your Dockerfile, because you need to also understand the context of the technology you are building for. If, for example, you are bulding a Dockerfile to be used in a PHP project, you’ll need to dive into PHP specific knowledge, like configuration methods, PHP extensions, environment settings and such.
The good news is that you can save a lot of time when starting out experimenting with a new technology, because you can use an image prepared by someone else, without understanding the details immediately. Once you are up for some more complex stuff you can start adding to the knowledge that you can extract and learn from other people’s Dockerfiles.
Reading Dockerfiles prepared by others is a great way to learn about technology.
Listing Docker images on your computer
Let’s do some hands-on magic. Before building your own Docker images, let’s see how to manage images on your computer.
You can follow the video for this part at around 8:00, I’ll provide a summary here.
Use the command docker images in your terminal to list the images you currently have on your computer. Remember that images are stored on your computer once you pull them from a registry like the Docker store, or once you build them on your computer.
If you have not pulled any images yet, your list may be empty. This is my computer today (please note that the list is different from the list in the video, because I’m writing this article later in time).
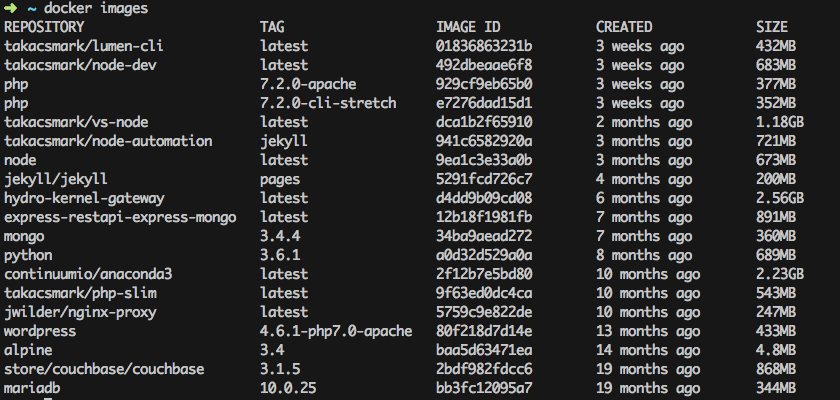
These are the images that I’m currently using on my computer. I pulled most of them from the Docker store, and I have built my own, too. The images that have a nametag in the form of takacsmark/<image_name> are the ones that I have built from my own Dockerfiles.
Please note that I usually don’t keep all the images that I use, I try to keep everything nice and clean, because images take up space.
It is worthwhile to check the image sizes in the picture. You’ll find that some images have a very small footprint, like the Alpine linux image, while more complex image take up a lot of space, like anaconda3.
Let’s create your first image
Let’s start the journey by creating a modified Alpine Linux image. We’ll take the base Alpine image from the Docker store and modify it by installing a few Linux packages. Please execute the following in terminal:
1. Create the Dockerfile
Create an empty directory for this task and create an empty file in that directory with the name Dockerfile. You can do this easily by issuing the command touch Dockerfile in your empty directory.
Congratulations, you just created your first Dockerfile! Let’s open the file in your favorite text editor!
The Alpine image does not have git, vim and curl by default, as you can see in the video. So let’s create a custom image from Alpine that has git, vim and curl included. This will be your first custom Docker image.
2. Define the base image with FROM
Every Dockerfile must start with the FROM instruction. The idea behind is that you need a starting point to build your image. You can start FROM scratch, scratch is an explicitly empty image on the Docker store that is used to build base images like Alpine, Debian and so on.
I start my images mostly from other images. You can start you Docker images from any valid image that you pull from public registries. The image you start from is called the base image. In our case let’s add FROM alpine:3.4 to the Dockerfile.
Right now your Dockerfile should look like this:
FROM alpine:3.4
3. Add the lines to install packages
Please add the lines to install vim and curl like this:
FROM alpine:3.4

RUN apk update
RUN apk add vim
RUN apk add curl
This is not best practice, these are just a few lines to get started. Don’t worry, you’ll learn the best practices in this article.
4. Build your image
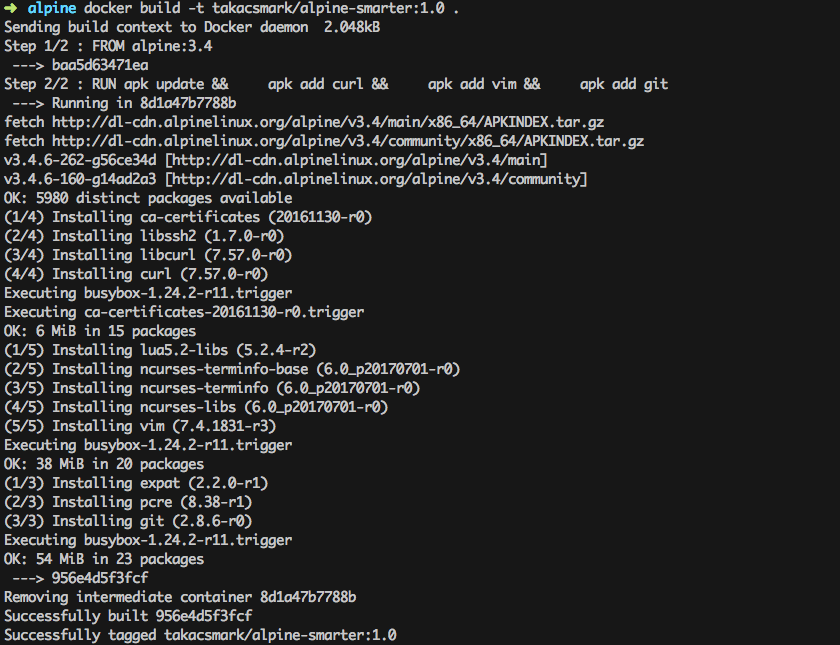
Please run the following in terminal:
docker build -t takacsmark/alpine-smarter:1.0 .
This command is structured as follows:
docker buildis the command to build a Docker image from a Dockerfile- -t takacsmark/alpine-smarter:1.0 defines the tag (hence -t) of the image, which will be basically the name of the image. As the first part I put my own name
takacsmark, because I’m the maintainer of the image, then I gave it a human readable namealpine-smarterand provided a version number1.0. - please note the
.(dot) at the end of the line. You need to specify the directory wheredocker buildshould be looking for a Dockerfile. Therefore.tellsdocker buildto look for the file in the current directory.
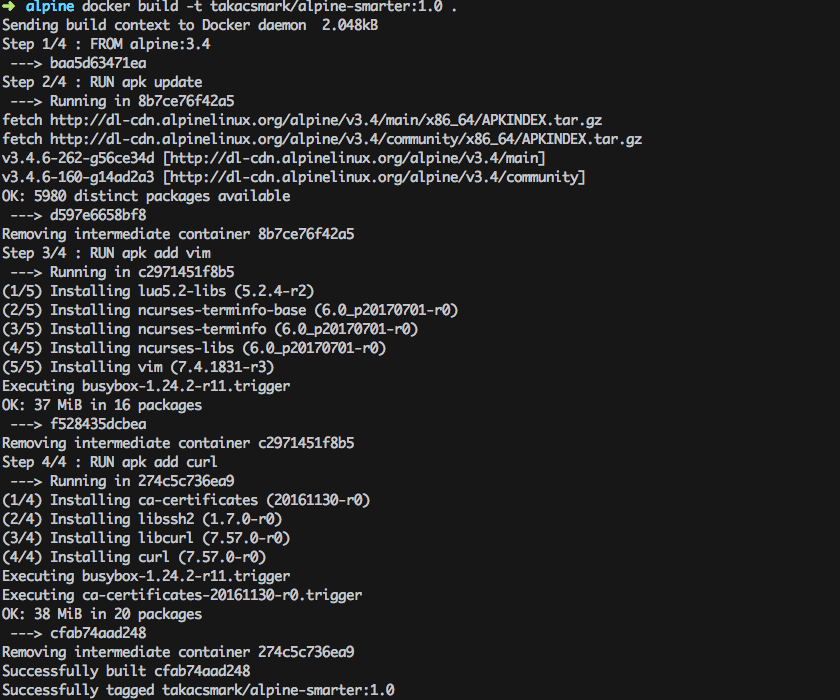
You should see a similar output in terminal now:
5. Enjoy the results
Docker created an image from your Dockerfile. You should see a new image in your image list issuing docker images again.
Let’s check what’s inside our new image, let’s run the following command and check out vim and curl:
docker run --rm -ti takacsmark/alpine-smarter:1.0 /bin/sh
Right now you should be in the shell of your running container, so let issue the following commands:
vim --v and curl --version. You should be seeing the version of vim and curl in your terminal.
We have successfully added two packages to the Alpine base image. Let’s not stop here, there is more!
Understand image layering
If you look at the above screen shot again you can notice that docker build provided the build output in 4 steps, namely Step 1/4, Step 2/4, Step 3/4 and Step 4/4.
At the headline of each step you can see the corresponding line in your Dockerfile. This is because docker build executes the lines in the Dockerfile one at a time.
What is more important that with every step in the build process Docker will create an intermediary image for the specific step. This means that Docker will take the base image (alpine:3.4), then execute RUN apk update and then Docker will add the resulting files from that step as another layer on top of the base image.
You can follow the concept by following the line in the output that start with ----> these lines denote the image ids of intermediary images.
This means that the final Docker image consist of 4 layers and the intermediary layers are also available on your system as standalone images. This is useful because Docker will use the intermediary images as image cache, which means your future builds will be much faster for those Dockerfile steps that you do not modify.
Let’s first see all the images that were created. Please issue the command
docker images -a in terminal.
You should see something like this:

We used -a to list all images on your computer including intermediary images. Please note how the image ids are the same as the ones you see during the build process.
Only RUN, COPY and ADD instructions create layers to improve build performance.
The main advantage of image layering lies in image caching.
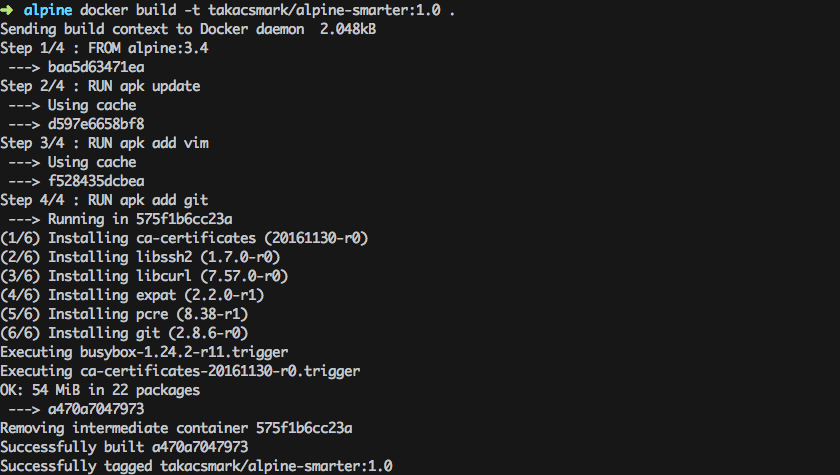
If you build your Dockerfile again now with the same command docker build -t takacsmark/alpine-smarter:1.0 ., you’ll notice that the build was almost instantaneous and the output for every step says that the build was done from cache.
This behavior makes our lives a lot easier. Since image layers are built on top of each other Docker will use images cache during the build process up to the line where the first change occurs in your Dockerfile. Every later step will be re-built.
Please note that each layer only stores the differences compared to the underlying layer. The video may be misleading from this perspective, because I interperet the sizes in docker images -a differently. The right interpretation is that docker images and docker images -a display the size of the image including the size of parent images.
Image cache example
Let’s play with the cache a little bit. Let’s change our Dockerfile to see the behavior. Let’s change the list line from adding curl to adding git. This is the resulting file:
FROM alpine:3.4

RUN apk update
RUN apk add vim
RUN apk add git
Let’s issue our build command again: docker build -t takacsmark/alpine-smarter:1.0 ..
You’ll see that the first 3 steps run using cache and only the last step will be re-run, as shown in the picture.
Please note that if you change an early step in the Dockerfile, for example you add one line after apk update like this:
FROM alpine:3.4

RUN apk update
RUN apk add curl
RUN apk add vim
RUN apk add git
In this case every step after the change will be re-built. Which means that the steps to install curl, vim and git will be run from scratch, no caching will be available beyond the point where the change occured.
Dangling images
If you execute docker images now in terminal, you’ll see something nasty.

Our newly built image is ready to use, but the previous image that we built with curl is still hanging around and it does not have a proper tag or name right now. (You can check the image ids to see that this is the same image we built previously).
Docker calls such images dangling images.
You can use the following command to list dangling images:
docker images --filter "dangling=true"
I personally don’t like it when images are just hanging around without a purpose, so here is how to remove them:
docker rmi $(docker images -q --filter "dangling=true").
Dockerfile best practices
Minimize the number of steps in the Dockerfile
Minimizing the number of steps in your image may improve build and pull performance. Therefore it’s a cool best practice to combine several steps into one line, so that they’ll create only one intermediary image.
We can reformulate our Dockerfile like this:
FROM alpine:3.4

RUN apk update && \
    apk add curl && \
    apk add vim && \
    apk add git
After building this Dockerfile the usual way you’ll find that this time it has only taken 2 steps instead of 4, which will result in 1 new image, instead of 3 images.
Keep in mind that only RUN, COPY and ADD instructions create layers.
Sort multi-line instructions
It’s a good idea to sort multiline instructions in a human readable manner. My example above is not optimal, because I’m installing packages in no order at all. I should write a file like this instead, where I order packages in alphabetical order. This is very useful when you work with a long list.
FROM alpine:3.4

RUN apk update && \
    apk add curl && \
    apk add git && \
    apk add vim
(Yes you can remove apk add from the last 3 lines like this):
FROM alpine:3.4

RUN apk update && apk add \
    curl \
    git \
    vim
Start your Dockerfile with the steps that are least likely to change
This is easier said than done. Anyway, your image will stabilize after a while and changes will be less likely. The best practice is to structure your Dockerfile according to the following:
- Install tools that are needed to build your application.
- Install dependencies, libraries and packages.
- Build your application.
Clean up your Dockerfile
Always review your steps in the Dockerfile and only keep the minimum set of steps that are needed by your application. Always remove unnecessary components.
Use a .dockerignore file
The directory where you issue the docker build command is called the build context. Docker will send all of the files and directories in your build directory to the Docker daemon as part of the build context. If you have stuff in your directory that is not needed by your build, you’ll have an unnecessarily larger build context that results in a larger image size.
You can remedy this situation by adding a .dockerignore file that works similarly to .gitignore. You can specify the list of folders and files that should be ignored in the build context.
If you want to have a look at the size of your build context, just check out the first line of your docker build output. My alpine build output for example says: Sending build context to Docker daemon 2.048kB.
Containers should be ephemeral
This would belong to generic Docker guidelines, but it’s never enough to stress this point. It is your best interest to design and build Docker images that can be destroyed and recreated/replaced automatically or with minimal configuration.
Which means that you should create Dockerfiles that define stateless images. Any state, should be kept outside of your containers.
One container should have one concern
Think of containers as entities that take responsibility for one aspect of your project. So design your application in a way that your web server, database, in-memory cache and other components have their own dedicated containers.
You’ll see the benefits of such a design when scaling your app horizontally. We’ll look into interoperability of containers and container networking in a future tutorial.
It’s a good idea to check out the official Dockerfile best practices page for more info.
Dockerfile key instructions best practices
The official Docker documentation is usually very easy to follow and easy to understand. What I learnt from your comments is, that the stuff that most people need is some insight into others’ experience to see the big picture.
The reason why I’ll give you some insight into the key instructions is to share my experience and give you hints how to use them. I’ll not give you the specs, for exact specs please check the Dockerfile reference page.
We’ll cover the following basic instructions to get you started:
FROM- every Dockerfile starts withFROM, with the introduction of multi-stage builds as of version 17.05, you can have more than oneFROMinstruction in one Dockerfile.COPYvsADD- these two are often confused, so I’ll explain the difference.ENV- well, setting environment variables is pretty important.RUN- let’s run commands.VOLUME- another source of confusion, what’s the difference between DockerfileVOLUMEand container volumes?USER- when root is too mainstream.WORKDIR- set the working directory.EXPOSE- get your ports right.ONBUILD- give more flexibility to your team and clients.
FROM
For beginners it’s enough to understand that every Dockerfile must start with the FROM instruction in the form of FROM <image>[:tag]. This will set the base image for your Dockerfile, which means that subsequent instructions will be applied to this base image.
The tag value is optional, if you don’t specify the tag Docker will use the tag latest and will try and use or pull the latest version of the base image during build.
On the little bit more advanced side, let’s note the following:
- There is one instruction that you can put before
FROMinto your Dockerfile. This instruction isARG.ARGis used to specify arguments for thedocker buildcommand with the--build-arg <varname>=<value>flag. - You can have more than one
FROMinstructions in your Dockerfile. You will want to use this feature, for example, when you use one base image to build your app and another base image to run it.
It’s called a multi-stage build and you can read about it here.
This is why every section that starts with FROM in your Dockerfile is called a build stage (even in the simple case of having only one FROM instruction). You can specify the name of the build stage in the form FROM <image>[:tag] [AS <name>].
COPY vs ADD
Both ADD and COPY are designed to add directories and files to your Docker image in the form of ADD <src>... <dest> or COPY <src>... <dest>. Most resources, including myself, suggest to use COPY.
The reason behind this is that ADD has extra features compared to COPY that make ADD more unpredictable and a bit over-designed. ADD can pull files from url sources, which COPY cannot. ADD can also extract compressed files assuming it can recognize and handle the format. You cannot extract archives with COPY.
The ADD instruction was added to Docker first, and COPY was added later to provide a straightforward, rock solid solution for copying files and directories into your container’s file system.
If you want to pull files from the web into your image I would suggest to use RUN and curl and uncompress your files with RUN and commands you would use on the command line.
ENV
ENV is used to define environment variables. The interesting thing about ENV is that it does two things:
- You can use it to define environment variables that will be available in your container. So when you build an image and start up a container with that image you’ll find that the environment variable is available and is set to the value you specified in the Dockerfile.
- You can use the variables that you specify by
ENVin the Dockerfile itself. So in subsequent instructions the environment variable will be available.
RUN
RUN will execute commands, so it’s one of the most-used instructions. I would like to highlight two points:
- You’ll use a lot of
apt-gettype of commands to add new packages to your image. It’s always advisable to putapt-get updateandapt-get installcommands on the same line. This is important because of layer caching. Having these on two separate lines would mean that if you add a new package to your install list, the layer withapt-get updatewill not be invalidated in the layer cache and you might end up in a mess. Read more here. RUNhas two forms;RUN <command>(called shell form) andRUN ["executable", "param1", "param2"]called exec form. Please note thatRUN <command>will invoke a shell automatically (/bin/sh -cby default), while the exec form will not invoke a command shell. If you want to tackle a problem around this read here.
VOLUME
This is where I found Docker documentation not so easy to follow. So let me put it in plain English.
You can use the VOLUME instruction in a Dockerfile to tell Docker that the stuff you store in that specific directory should be stored on the host file system not in the container file system. This implies that stuff stored in the volume will persist and be available also after you destroy the container.
In other words it is best practice to crate a volume for your data files, database files, or any file or directory that your users will change when they use your application.
The data stored in the volume will remain on the host machine even if you stop the container and remove the container with docker rm. (The volume will be removed on exit if you start the container with docker run --rm, though.)
You can also share these volumes between containers with docker run --volumes-from.
You can inspect your volumes with the docker volume ls and docker volume inspect commands.
You can also have a look inside your volumes by navigating to Docker volumes in your file system. On Linux you can go to /var/lib/docker/volumes pick the id of the volume and list it as a directory. You can find out the id of the container and thus the volume by running docker inspect on your container.
On Mac, you’ll not be able to access /var/lib/docker/volumes so easily. If you run screen ~/Library/Containers/com.docker.docker/Data/com.docker.driver.amd64-linux/tty on your Mac, you get a terminal where you can navigate as if you were using a Linux machine.
The difference between the VOLUME instruction in Dockerfile and starting your container with docker run -v ... is this: VOLUME in Dockerfile will create a new empty directory for your files under the standard Docker structure, i.e. /var/lib/docker/volumes. docker run -v ... can do more, you can mount existing directories from your host file system into your container and you can also specify the path of the directory on the host.
Now you may think that docker run -v ... is the better option, but keep in mind that mounting an existing directory assumes that the directory exists on the host, which may give you portability issues.
This topic is a good candidate for another detailed post and video, so let’s move on for now.
USER
Don’t run your stuff as root, be humble, use the USER instruction to specify the user. This user will be used to run any subsequent RUN, CMD AND ENDPOINT instructions in your Dockerfile.
WORKDIR
A very convenient way to define the working directory, it will be used with subsequent RUN, CMD, ENTRYPOINT, COPY and ADD instructions. You can specify WORKDIR multiple times in a Dockerfile.
If the directory does not exists, Docker will create it for you.
EXPOSE
An important instruction to inform your users about the ports your application is listening on. EXPOSE will not publish the port, you need to use docker run -p... to do that when you start the container.
CMD and ENTRYPOINT
CMD is the instruction to specify what component is to be run by your image with arguments in the following form: CMD [“executable”, “param1”, “param2”…].
You can override CMD when you’re starting up your container by specifying your command after the image name like this: $ docker run [OPTIONS] IMAGE[:TAG|@DIGEST] [COMMAND] [ARG...].
You can only specify one CMD in a Dockerfile (OK, physically you can specify more than one, but only the last one will be used).
It is good practice to specify a CMD even if you are developing a generic container, in this case an interactive shell is a good CMD entry. So you do CMD ["python"] or CMD [“php”, “-a”] to give your users something to work with.
So what’s the deal with ENTRYPOINT? When you specify an entry point, your image will work a bit differently. You use ENTRYPOINT as the main executable of your image. In this case whatever you specify in CMD will be added to ENTRYPOINT as parameters.
ENTRYPOINT ["git"]
CMD ["--help"]
This way you can build Docker images that mimic the behavior of the main executable you specify in ENTRYPOINT.
ONBUILD
This is so nice. You can specify instructions with ONBUILD that will be executed when your image is used as the base image of another Dockerfile. :)
This is useful when you want to create a generic base image to be used in different variations by many Dockerfiles, or in many projects or by many parties.
So you do not need to add the specific stuff immediately, like you don’t need to copy the source code or config files in the base image. How could you even do that, when these things will be available only later?
So what you do instead is to add ONBUILD instructions. So you can do something like this:
ONBUILD COPY . /usr/src/app
ONBUILD RUN /usr/src/app/mybuild.sh
ONBUILD instructions will be executed right after the FROM instruction in the downstram Dockerfile.
My Dockerfile building workflow
It’s time to have a look at the second video on Youtube. Please have a look and let’s move on.
Now that we looked at the toolset and best practices, you might be wondering, what is the best way of building your Dockerfile.
Well, I think everybody has their own ways, let me show you mine.
Writing the Dockerfile is fairly simple. The hard part is to know what steps you need to take to set up your environment. This will largely depend on the technology you’re working with and your knowledge of that specific technology.
I use a fairly straightforward 4 step approach to build my Dockerfiles in an iterative manner. It is the following:
-
Pick the right base image - in this step I experiment with the base images available on-line for the technology in question. I usually check out different flavors, like an image based on Debian Jessie and another on based on Alpine.
I also check out the images made by others for a specific technology. For node.js, for example, I’m not building my own images from a Linux base, I usually use the offical node images as a base image.
When working with php, I usually start from php with the Apache web server included and add my stuff myself.
-
Go to shell and build your environment - as a next step I go with a try-and-fail approach. I pull my chosen images to my computer and start a container in interactive mode with a shell.
I start manually executing the steps in the container and see how things work out. Once a step seems to be OK, I add it to my Dockerfile.
If something goes wrong, I change the course, and I update the Dockerfile immediately.
-
Add the steps to your Dockerfile and build your image - I keep adding steps continuously as I make progress with my setup in the container.
Every now and then I stop and build my image from the Dockerfile to make sure that it produces the same results every time.
Then I use the newly built image to start a container with a shell and go on with my installation and set-up steps.
-
Repeat steps 2 and 3 - I keep repeating steps 2 and 3 until I reach the stage that I like.
Please note that you can do a lot of fancy stuff for production applications and team work, like multi-stage builds, image hierarchies, shared volumes, networked containers, swarm and a lot more.
We’ll come back to these in another article.
Wrap up
This post is too long already, so I’ll not give you a summary now. :) Please comment and share if you liked it, and make sure to subscribe on Youtube and follow me on Facebook and Twitter for updates.